spring-boot で CircuitBreaker を試してみた
CircuitBreaker Patternを導入したくて少し調べたら Netfix の Hystrix というライブラリが良さそうであったのでspring-bootで利用するために少し試したことをまとめておく。
そもそもCircuitBreakerとは、そのままの英語だと、電源回路の遮断機という意味ですが、今回の意味では障害検知・検出のための装置(オブジェクトやソフトウェア的な仕組み)を導入して一部の障害が他の障害を引き起こしシステム全体の障害に広がることを遮断することです。詳しくは、Martin fowlerさんが言っています。
いろいろ調べると、spring-boot でも Netflix の Hystrix を使えるようです。
まずは、簡単に試してみた。
コード変更内容は、CircuitBreakerに関する処理のHookをHystrixCommandExecutionHookを使って登録して、ログを追加してわかりやすいようにした。
gs-circuit-breakerのプロジェクトの内容は、以下の図のようになっている。bookstoreのAPIである:8090/recommendが停止している場合 に、readingのAPIがエラーになるため、bookstoreへの呼び出し部分にCircuitBreakerを適用して、bookstoreが問題になった場合(例えば、ネットワーク的な問題が発生した場合のコネクションエラーやタイムアウトなど)に回避する仕組みを導入することです。

そして、CircuitBreakerの重要なコードは以下のようになります。
@Service
@Slf4j
public class BookService {

    @HystrixCommand(fallbackMethod = "reliable")
    public String readingList() {
        try {
            RestTemplate restTemplate = new RestTemplate();
            URI uri = URI.create("http://localhost:8090/recommended");
            final String reading = restTemplate.getForObject(uri, String.class);
            log.info("(Success in reading list)");
            return reading;
        } catch (Throwable e) {
            log.error("<<Failed>> Reading lists in Book service. cause:{}", e.getMessage());
            throw e;
        }
    }

    public String reliable() {
        log.error("(In fallback method)");
        return "Cloud Native Java (O'Reilly)";
    }

}
まずは正常な場合、つまりCircuitBreakerがCLOSEの場合は、どんな振る舞いをするのか確認してみるため、bookstore、readingのAPPを起動し、curlを使ってreadingのAPIを呼び出します。
結果は以下のようになりました。
// bookstoreとreadingでgradle bootRunを実行
$ gradle bootRun
// reading 側のログ
[nio-8080-exec-3] hello.ReadingApplication                 : [start] /to-read
[nio-8080-exec-3] hello.ReadingApplication                 : [onStart] --- ①
[x-BookService-2] hello.ReadingApplication                 : [onThreadStart] --- ②
[x-BookService-2] hello.ReadingApplication                 : [onExecutionStart] --- ③
[x-BookService-2] hello.BookService                        : (Success in reading list)
[x-BookService-2] hello.ReadingApplication                 : [onExecutionEmit] value:Spring in Action (Manning), Cloud Native Java (O'Reilly), Learning Spring Boot (Packt)  --- ④
[x-BookService-2] hello.ReadingApplication                 : [onEmit] value:Spring in Action (Manning), Cloud Native Java (O'Reilly), Learning Spring Boot (Packt)  --- ⑤
[x-BookService-2] hello.ReadingApplication                 : [onExecutionSuccess]  --- ⑥
[x-BookService-2] hello.ReadingApplication                 : [onThreadComplete]  --- ⑦
[x-BookService-2] hello.ReadingApplication                 : [onSuccess]  --- ⑧
[nio-8080-exec-3] hello.ReadingApplication                 : [end] /to-read
上記のログをみるとBookSercice#readingListを呼び出す時点(①、②)、スレッドが切り替わりHystrixが管理するスレッドに切り替わっていることがわかる。
当然今回は、bookstoreのAPIは正常にアクセスできるため、Fallbackが発生しない。
今度は、Fallbackを発生させるため、bookstoreのプロセスを停止してもう一度curlでreadingのAPIを呼び出す。
[nio-8080-exec-5] hello.ReadingApplication                 : [start] /to-read
[nio-8080-exec-5] hello.ReadingApplication                 : [onStart]
[x-BookService-3] hello.ReadingApplication                 : [onThreadStart]
[x-BookService-3] hello.ReadingApplication                 : [onExecutionStart]
[x-BookService-3] hello.BookService                        : <<Failed>> Reading lists in Book service. cause:I/O error on GET request for "http://localhost:8090/recommended":Connection refused; nested exception is java.net.ConnectException: Connection refused  --- ①
[x-BookService-3] hello.ReadingApplication                 : [onExecutionError] message:I/O error on GET request for "http://localhost:8090/recommended":Connection refused; nested exception is java.net.ConnectException: Connection refused --- ②
[x-BookService-3] hello.ReadingApplication                 : [onFallbackStart] --- ③
[x-BookService-3] hello.BookService                        : (In fallback method) --- ④
[x-BookService-3] hello.ReadingApplication                 : [onFallbackEmit] value:Cloud Native Java (O'Reilly) --- ⑤
[x-BookService-3] hello.ReadingApplication                 : [onEmit] value:Cloud Native Java (O'Reilly) --- ⑦
[x-BookService-3] hello.ReadingApplication                 : [onFallbackSuccess] --- ⑧
[x-BookService-3] hello.ReadingApplication                 : [onThreadComplete] --- ⑨
[x-BookService-3] hello.ReadingApplication                 : [onSuccess] --- ⑩
[nio-8080-exec-5] hello.ReadingApplication                 : [end] /to-read
上記の通り、BookService#readingListで例外が発生しHystrixで検知され(①、②)、Fallbackを指定したBookService#reliableが自動的に実行されていること(③〜⑧)が確認できます。結局コントローラ側へは成功として応答されていることが確認できました。どうやら想定されている動作がされているようです。
そして、CircuitBreakerの重要な点として、エラーが発生する処理が何度も実行されないように遮断することがあります。ここでbookstoreを停止したまま、多くのアクセスを実行してみました。
// 100回アクセスする
ab -n 100 -c 1 http://localhost:8080/to-read
すると、最初のうちは先程の結果と同じく、BookService#readingListが実行されエラー検出後にFallbackが呼び出される処理がされますが、しばらくすると以下のログのような振る舞いになることが確認できました。
[nio-8080-exec-5] hello.ReadingApplication                 : [start] /to-read
[nio-8080-exec-5] hello.ReadingApplication                 : [onStart]
[nio-8080-exec-5] hello.ReadingApplication                 : [onFallbackStart]
[nio-8080-exec-5] hello.BookService                        : (In fallback method)
[nio-8080-exec-5] hello.ReadingApplication                 : [onFallbackEmit] value:Cloud Native Java (O'Reilly)
[nio-8080-exec-5] hello.ReadingApplication                 : [onEmit] value:Cloud Native Java (O'Reilly)
[nio-8080-exec-5] hello.ReadingApplication                 : [onFallbackSuccess]
[nio-8080-exec-5] hello.ReadingApplication                 : [onSuccess]
[nio-8080-exec-5] hello.ReadingApplication                 : [end] /to-read
[nio-8080-exec-6] hello.ReadingApplication                 : [start] /to-read
[nio-8080-exec-6] hello.ReadingApplication                 : [onStart]
[nio-8080-exec-6] hello.ReadingApplication                 : [onFallbackStart]
[nio-8080-exec-6] hello.BookService                        : (In fallback method)
[nio-8080-exec-6] hello.ReadingApplication                 : [onFallbackEmit] value:Cloud Native Java (O'Reilly)
[nio-8080-exec-6] hello.ReadingApplication                 : [onEmit] value:Cloud Native Java (O'Reilly)
[nio-8080-exec-6] hello.ReadingApplication                 : [onFallbackSuccess]
[nio-8080-exec-6] hello.ReadingApplication                 : [onSuccess]
[nio-8080-exec-6] hello.ReadingApplication                 : [end] /to-read
そうです、ログを見るとBookService#readingListは呼びだされていませんし、スレッドの切り替えも発生せずにFallbackが処理されています。下記の図のようになり、これで問題のあるbookstoreを回避して応答することになりました。
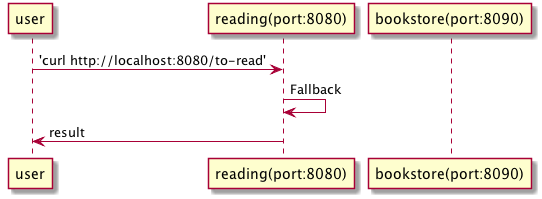
このように、CircuitBreakerは、外部のサービスと連携するような場合、外部サービスの問題や障害で自分のサービスのスレッドプールなどを使い切ることによりシステム全体の応答が遅延して全体的なサービス障害につながってしまうなどの影響を最小化することに力を発揮できますし、 例えば、Fallback側ではキャッシュを呼び出し一時的に古い情報を提供することなども可能でしょう。
今後、@HystrixCommandアノテーションの属性@HystrixPropertyを使って幾つかCircuitBreakerの条件を設定できるようなので、今後はプロパティの変更して試してみます。
Kafka を試してみた
最近、仕事で、Kafkaを利用することが多くなってちょっと簡単に調べてみたので残す。 Kafka のサイトを見ると以下のように歌っているのでとにかく、高性能なmessage systemだとあることは知っていた。
Apache Kafka - "A high-throughput distributed messaging system."
ブローカー1つで試してみた
何はともあれ、まずはkafkaのセットアップをしてみた。 とりあえず、最新の0.9.x.xを自分のMacへインストール。
まず、zookeeperのインストールと起動
$ wget http//ftp.jaist.ac.jp/pub/apache/zookeeper/stable/zookeeper-3.4.6.tar.gz
$ tar xvf zookeeper-3.4.6.tar.gz
$ ln -s zookeeper-3.4.6 zookeeper
$ cd zookeeper
$ bin/zkServer.sh start
zoo_sample.cfg をそのまま zoo.cfgにコピーしてから起動させてる
次に、kafkaのインストールと起動。特にserver.propertiesは編集していないでもとりあえず大丈夫。 この場合だと、ブローカーは1ノードになる。
$ wget http://ftp.riken.jp/net/apache/kafka/0.9.0.0/kafka_2.11-0.9.0.0.tgz
$ tar xvf kafka_2.11-0.9.0.0.tgz
$ ln -s kafka_2.11-0.9.0.0 kafka
$ cd kafka
$ bin/kafka-server-start.sh config/server.properties
そして、topicを作成する。この時作成したのは、パーティションが1つだけのものと、パーティションが10個のもの
$ bin/kafka-topics.sh --create --zookeeper localhost:2181 --replication-factor 1 --partitions 1 --topic study-kafka
Created topic "study-kafka".
$ bin/kafka-topics.sh --create --zookeeper localhost:2181 --replication-factor 1 --partitions 10 --topic kafka-partitions
Created topic "kafka-partitions".
$ bin/kafka-topics.sh --list --zookeeper localhost:2181
kafka-partitions
study-kafka
作成した結果のkafkaのlog.dirsにはこんな感じにデータのディレクトリが作成されていた。topic名 + パーティション数になっている

ちなみに、brokerが1つなので、--replication-factorを2とかにするとこんな感じで怒られる。

そんでもって、簡単な Java アプリケーションを使って試してみる。作成したJavaアプリケーションはgithubで
作成したアプリケーションでメッセージを送るとこんな感じのログがでる。
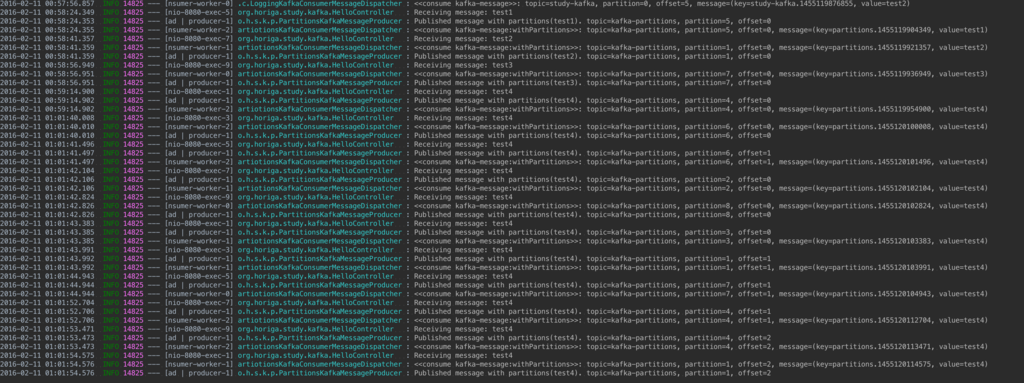
ログをみると、コンシューマー側のスレッドは、固定のパーティションに紐付くから、パーティション単位での順序性は確保されるということがわかる。そして、offsetもパーティション単位で管理している。 keyの設定でパーティションが決定されるとすると、keyの設計が大事になりそう。例えばホスト単位とか、メトリクス単位とか?
ブローカーを複数にする
実際のところブローカーを1つだけってことは、サービス上でありえないしkafkaの意味がないと思うので、今度は、ブローカーを複数にしてみる。 zookeeperとかの設定を初期化しちゃってから以下のようなプロパティファイルを作成して。ブローカーを3つ(3プロセス)起動した。
| config/server-1.properties | config/server-2.properties | config/server-3.properties | |
|---|---|---|---|
broker.id |
1 | 2 | 3 |
listeners |
PLAINTEXT://:19092 | PLAINTEXT://:29092 | PLAINTEXT://:39092 |
port |
19092 | 29092 | 39092 |
log.dirs |
~/apps/kafka/data/server-1 | ~/apps/kafka/data/server-2 | ~/apps/kafka/data/server-3 |
さっそく、ブローカーが1つの場合に失敗した、--relication-factorを2でtopicを作成
$ bin/kafka-topics.sh --create --zookeeper localhost:2181 --replication-factor 2 --partitions 10 --topic replication-topic
Created topic "replication-topic"
$ bin/kafka-topics.sh --list --zookeeper localhost:2181
replication-topic
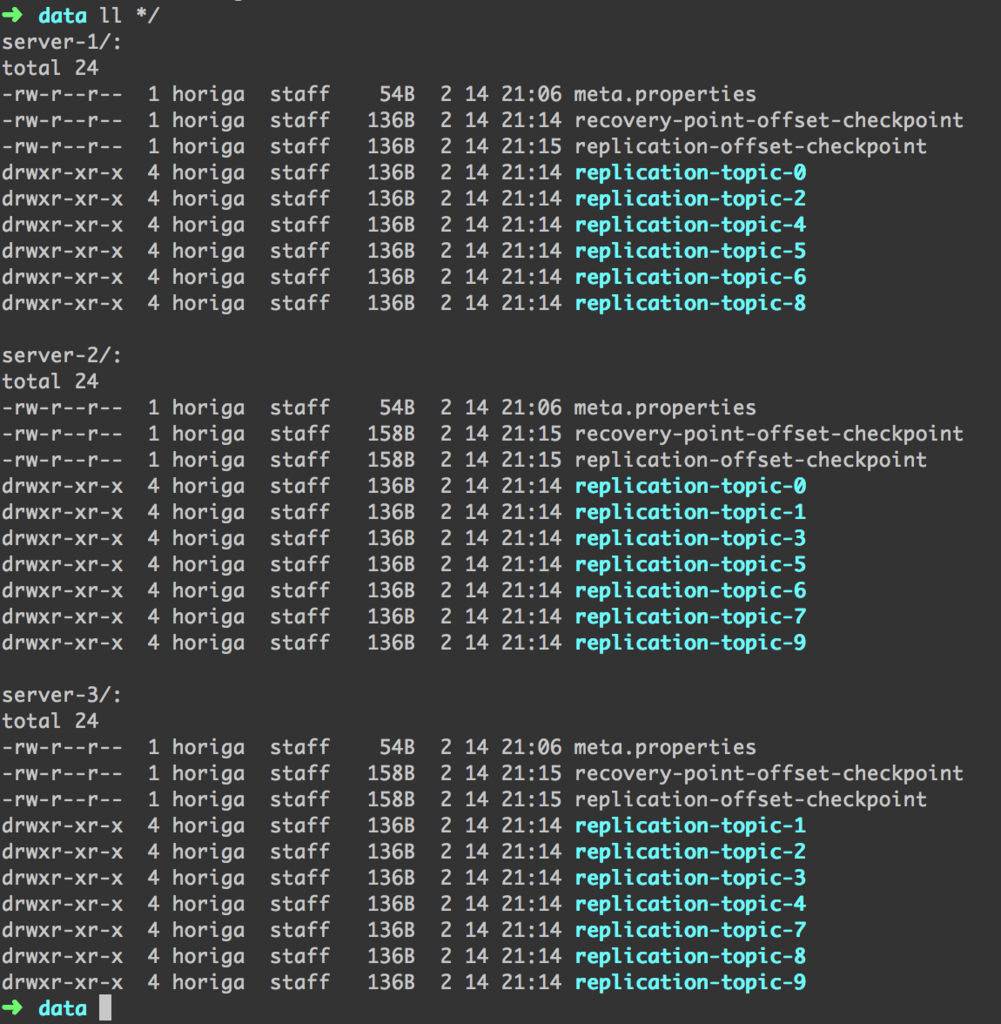
やった成功!そして、予想通り、--replication-factor 2 --partitions 10なので、20個のデータのディレクトリが作成されて、それぞれのパーティションが他のサーバで作成されていた。
あとはKafkaPrducerのブローカーリストの設定を変更してJavaアプリを実行しても問題なくできた。

1プロセスを落としてみる
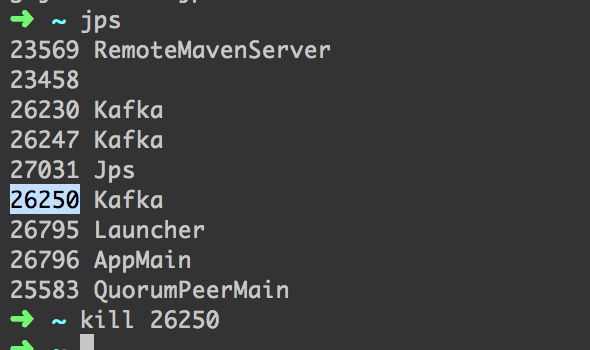
じゃあ、レプリケーション2なので1つ死んでも大丈夫かと思って1つプロセス(39092)を殺してやってみた。
参考までに殺したときのzookeeperと死んでないブローカーのログは以下のようになった。
停止したブローカーの担当していたパーティションは、1,2,3,4,7,8,9なので、ログを見ると、生きていたブローカーではレプリカがあるブローカーで担当する対となるパーティションのReplicaFetcherThreadなるものが停止されている。
- zookeeper

- Broker(kafka) - 19092, 29092


そしてJavaアプリケーション側も以下のようにブローカー(39092)が切断されたことを検知した後も問題なくメッセージをやり取りできることを確認できた。
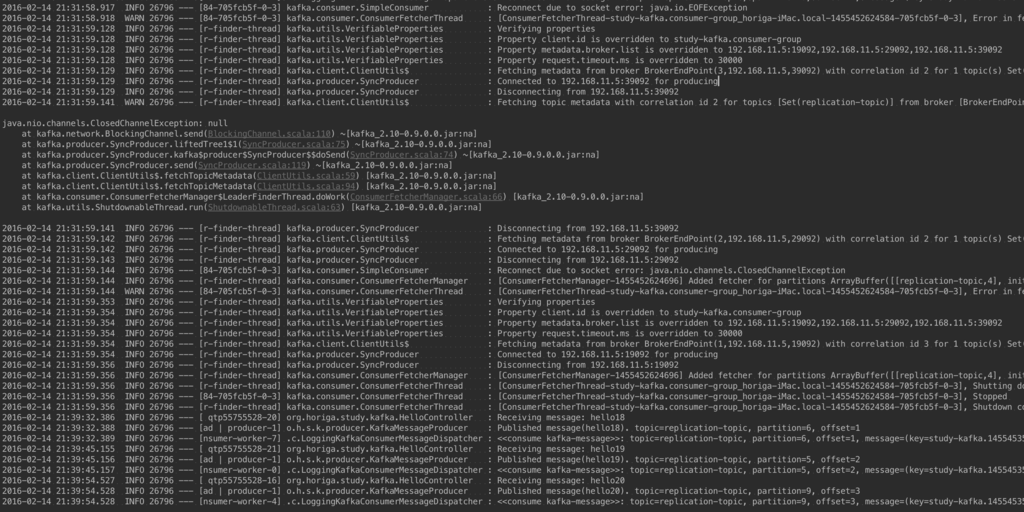
その後、ブローカー(39092)を復帰させた後もJava側でも復帰したことを検知していた。

全体として、簡単に導入できたし性能も報告をみるととても良いとある。障害性や分散も簡単にできそうなのでとても良さそうに感じた。
Kafka については以下の記事がとても参考になりました。
spring-boot で FlatBuffers を試してみた
FlatBuffersが気になってspring-bootを使って試してみたので忘れないうちに残します。
FlatBuffersはGoogleが作成したクロスプラットフォームのメッセージシリアライゼーションライブラリですが、同様なものにProtocolBuffersや、MessagePackなども有名だと思います。特に性能比較などは多くの記事でも照会されているので特に書かないですが、FlatBuffersは比較的新しいものでゲーム向けへの利用を考えて作成されたとあり、以下の特徴があるようです。また公式のサイトにbenchmarkの結果がありましたがとても性能が良さそうです。
- パース処理がなく高速にアクセスできる
- バッファメモリだけを利用することでデータアクセスを行うことができるため、省メモリに抑えられる
なんだか、モバイル環境のゲームなどには適していそうです。今回試した環境は以下です。 * Mac OS X 10.10 * JDK 1.8.0 u45
FlatBuffersを使えるようにする
flatbuffersをcloneして、flatcをビルドする
# git clone https://github.com/google/flatbuffers.git
// XCode で開く
# open flatbuffers/build/XCode/FlatBuffers.xcodeproj
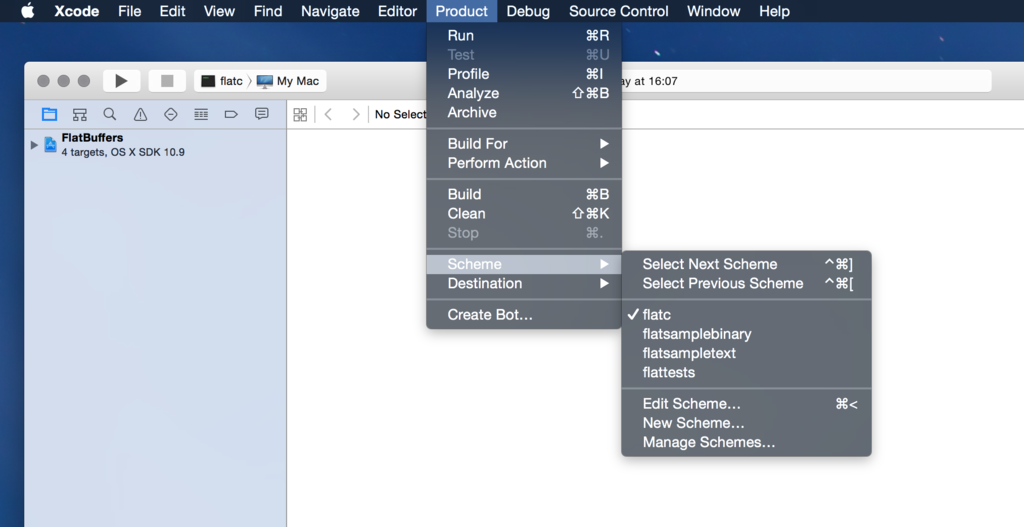
flatc バイナリがビルドされているので、PATHに追加する。今回は、/usr/local/binに追加した
# flatc -help                                                                                                         1 ↵
flatc: unknown commandline argument-help
usage: flatc [OPTION]... FILE... [-- FILE...]
  -b              Generate wire format binaries for any data definitions.
  -t              Generate text output for any data definitions.
  -c              Generate C++ headers for tables/structs.
  -g              Generate Go files for tables/structs.
  -j              Generate Java classes for tables/structs.
  -n              Generate C# classes for tables/structs.
  -p              Generate Python files for tables/structs.
  -o PATH         Prefix PATH to all generated files.
  -I PATH         Search for includes in the specified path.
  -M              Print make rules for generated files.
  --strict-json   Strict JSON: field names must be / will be quoted,
                  no trailing commas in tables/vectors.
  --defaults-json Output fields whose value is the default when
                  writing JSON
  --no-prefix     Don't prefix enum values with the enum type in C++.
  --gen-includes  (deprecated), this is the default behavior.
                  If the original behavior is required (no include
                  statements) use --no-includes.
  --no-includes   Don't generate include statements for included
                  schemas the generated file depends on (C++).
  --gen-mutable   Generate accessors that can mutate buffers in-place.
  --gen-onefile   Generate single output file for C#
  --raw-binary    Allow binaries without file_indentifier to be read.
                  This may crash flatc given a mismatched schema.
  --proto         Input is a .proto, translate to .fbs.
  --schema        Serialize schemas instead of JSON (use with -b)
FILEs may depend on declarations in earlier files.
FILEs after the -- must be binary flatbuffer format files.
Output files are named using the base file name of the input,
and written to the current directory or the path given by -o.
example: flatc -c -b schema1.fbs schema2.fbs data.json
今回は、Javaで利用したいので、Java クライアントライブラリも準備する
# cd flatbuffers/java
# mvn install
spring-boot で使ってみる
今回は、spring-bootで試したかったので以下のようなプロジェクトを作成した。
- pom.xml
...

<dependencies>
  <dependency>
    <groupId>org.springframework.boot</groupId>
    <artifactId>spring-boot-starter-web</artifactId>
    <exclusions>
      <exclusion>
        <groupId>org.springframework.boot</groupId>
        <artifactId>spring-boot-starter-tomcat</artifactId>
      </exclusion>
    </exclusions>
  </dependency>

  <dependency>
    <groupId>org.springframework.boot</groupId>
    <artifactId>spring-boot-starter-jetty</artifactId>
  </dependency>

  <dependency>
    <groupId>org.springframework.boot</groupId>
    <artifactId>spring-boot-starter-actuator</artifactId>
  </dependency>

  <dependency>
    <groupId>org.springframework.boot</groupId>
    <artifactId>spring-boot-starter-test</artifactId>
    <scope>test</scope>
  </dependency>

  <dependency>
    <groupId>com.google.flatbuffers</groupId>
    <artifactId>flatbuffers-java</artifactId>
    <version>1.2.0-SNAPSHOT</version>
  </dependency>

  <dependency>
    <groupId>com.fasterxml.jackson.module</groupId>
    <artifactId>jackson-module-afterburner</artifactId>
    <version>2.4.0</version>
  </dependency>
  <dependency>
    <groupId>com.fasterxml.jackson.datatype</groupId>
    <artifactId>jackson-datatype-jsr310</artifactId>
    <version>2.4.5</version>
  </dependency>

  <dependency>
    <groupId>com.google.guava</groupId>
    <artifactId>guava</artifactId>
    <version>18.0</version>
  </dependency>

  <dependency>
    <groupId>org.projectlombok</groupId>
    <artifactId>lombok</artifactId>
    <version>1.14.8</version>
    <scope>provided</scope>
  </dependency>

  <dependency>
    <groupId>com.ning</groupId>
    <artifactId>async-http-client</artifactId>
    <version>1.9.31</version>
  </dependency>

</dependencies>
...
以下のflatbuffersのIDLを簡単に作成してみた。
namespace org.horiga.study.springboot.flatbuffers.protocol.messages;

table Token {
    id: int;
    accessToken: string;
    created: long;
}

table Me {
    token: Token;
}

table UserAnswer {
    displayName: string;
    mid: string;
    pictureUrl: string;
}
IDLをflatcでコンパイルすると、IDLのnamespaceに定義した場所に-oオプションで指定した場所からの位置にjavaのファイルが作成される。
# flatc -j -o src/main/java src/main/idl/fbs/v1.0.fbs
今回作成したFlatBuffersのためのspring-bootの処理は以下のようなクラスを追加してみた。
public class FlatBuffersHttpMessageConverter extends AbstractHttpMessageConverter<Table> {

    public static final Charset DEFAULT_CHARSET = Charset.forName("UTF-8");

    public static final MediaType X_FLATBUFFERS = new MediaType("application", "x-fb", DEFAULT_CHARSET);

    public static final String X_FLATBUFFERS_MESSAGE_ID = "X-FBS-MessageId";

    protected final Map<String, FlatBuffersMessage> messageRepository;

    public FlatBuffersHttpMessageConverter(Map<String, FlatBuffersMessage> messageRepository) {
        super(X_FLATBUFFERS);
        this.messageRepository = messageRepository;
    }

    @Override
    protected boolean supports(Class<?> clazz) {
        return Table.class.isAssignableFrom(clazz);
    }

    @Override
    protected Table readInternal(Class<? extends Table> clazz, HttpInputMessage inputMessage)
            throws IOException, HttpMessageNotReadableException {

        final String messageId = inputMessage.getHeaders().getFirst(X_FLATBUFFERS_MESSAGE_ID);
        log.debug("Request.messageId: {}", messageId);

        if(Objects.isNull(messageId) ||
                !messageRepository.containsKey(messageId)) {
            throw new HttpMessageNotReadableException("Unknown message protocol identifier");
        }

        final long contentLength = inputMessage.getHeaders().getContentLength();
        final ByteArrayOutputStream out =
                new ByteArrayOutputStream(contentLength >= 0 ? (int) contentLength : StreamUtils.BUFFER_SIZE);
        StreamUtils.copy(inputMessage.getBody(), out);

        return messageRepository.get(messageId).build(ByteBuffer.wrap(out.toByteArray()));
    }

    @Override
    protected void writeInternal(Table message, HttpOutputMessage outputMessage) throws IOException, HttpMessageNotWritableException {
        setFlatBuffersResponseHeaders(message, outputMessage);

        final byte[] dst = new byte[getContentLength(message, X_FLATBUFFERS).intValue()];
        message.getByteBuffer().get(dst);

        StreamUtils.copy(dst, outputMessage.getBody());
    }

    @Override
    protected Long getContentLength(Table table, MediaType contentType) throws IOException {
        final ByteBuffer buf = table.getByteBuffer();
        return (long) (buf.limit() - buf.position());
    }

    private void setFlatBuffersResponseHeaders(final Table message, final HttpOutputMessage outputMessage) {
        // debug
    }
}
public class FlatBuffersMessage {

    private final String id;

    private final Class<?> klass;

    private final Method buildMethod;

    public FlatBuffersMessage(String id, Class<? extends Table> klass) throws Exception {
        this.id = id;
        this.klass = klass;
        final Method m = klass.getMethod("getRootAs" + klass.getSimpleName(), ByteBuffer.class);
        Preconditions.checkArgument(m != null, "This message is not FlatBuffers message");
        this.buildMethod = m;
    }

    public Table build(final ByteBuffer bytes)
            throws FlatBuffersMessageProtocolException {
        try {
            return (Table) this.buildMethod.invoke(klass, bytes);
        } catch (Exception e) {
            throw new FlatBuffersMessageProtocolException("Unavailable flatbuffers message.", e);
        }
    }
}
public class APIController {

    @RequestMapping(value = "/api", method = RequestMethod.POST)
    public Callable<Table> onMessage(
            @RequestBody Table message
    ) {

        // test
        if (message instanceof Me) {
            log.info("accessToken:{}", ((Me) message).token().accessToken());
            log.info("id         :{}", ((Me) message).token().id());
            log.info("created    :{}", ((Me) message).token().created());
        }

        return () -> {
            FlatBufferBuilder fbb = new FlatBufferBuilder(0);
            fbb.finish(UserAnswer.createUserAnswer(fbb,
                    fbb.createString("Hiroyuki Horigami"),
                    fbb.createString("12345"),
                    fbb.createString("//scontent-nrt1-1.xx.fbcdn.net/hphotos-xpa1/t31.0-8/891598_504258659637103_960802615_o.jpg")));
            UserAnswer resultMessage = UserAnswer.getRootAsUserAnswer(UserAnswer.getRootAsUserAnswer(fbb.dataBuffer()).getByteBuffer());
            return resultMessage;
        };
    }
}
簡単に説明すると、X-FB-MessageIdというリクエストのヘッダでなんのメッセージなのかを教えてもらって、それを元に受信したメッセージを読み取る。そして、MediaTypeはapplication/x-fbにしておいた。
もう少し改良するとすれば、X-FB-MessageIdにメッセージのIDを定義するのではなく、FlatBuffersの受信・応答メッセージの先頭部分にメッセージのIDを表す識別子(例えばshort typeの数字など)を定義したりJWTのように何か改ざんできないような仕組みを考えたかったけど、今回は簡単に実装しました。
ひとまず、ベンチマークとかとってないけど、簡単に使えそうだし良さそうな印象です。
さいごに
まだ詳しく調べてないので間違った部分もあると思います。指摘があればよろしくお願いいたします。
google-guava ListeningExecutorService 試してみた
私もここ数年 Java 開発してて、パラメータチェックとか、アプリケーション内での簡単なキャッシュ処理とかのユーティリティは guava よく使うんだけど、スレッド処理で guava の concurrent パッケージにある ListeningExecutorService ってクラスを使ってみたからまとめてみる. ちなみにGoogle guavaライブラリの説明は以下のようにされていてgoogleのJavaプロジェクトにおけるコアライブラリとして発展していて. 最新のバージョンは、The latest release is 17.0, released April 22, 2014 とある.
The Guava project contains several of Google's core libraries that we rely on in our Java-based projects: collections, caching, primitives support, concurrency libraries, common annotations, string processing, I/O, and so forth.
まずは、ListeningExecutorServiceの生成はこんな感じ. java で支援されているのはjava.util.concurrent.Executorsを使ってExecutorServiceを生成するがguavaの拡張版は、guavaが提供するcom.google.common.util.concurrent.MoreExecutorsを使ってListeningExecutorServiceを生成する.
protected static ListeningExecutorService es = MoreExecutors.listeningDecorator(
                        Executors.newCachedThreadPool(new ThreadFactory() {
                                    public Thread newThread(Runnable r) {
                                        return new Thread(r, "task-worker#" + RandomUtils.nextInt(100));
                                    }}));
そしてListeningExecutorServiceスレッドの実行方法は以下のように
ListenableFuture<String> future = es.submit(new Callable<String>() {
            /* (non-Javadoc)
            * @see java.util.concurrent.Callable#call()
            */
            public String call() throws Exception {
                            // do anything...
                        }});
このcom.google.common.util.concurrent.ListenableFutureが、既存のjava.util.concurrent.Futureの拡張で使いやすかった。
シンプルな例を少し作ったのでまとめておきます。
- リスナー
ListenableFuture<?>にスレッドの処理が終了されたときに呼び出されるリスナーを登録する方式
public class CallableWithListenerListenableFutureExcample {

    private static Logger log = LoggerFactory
            .getLogger(CallableWithListenerListenableFutureExcample.class);

    protected static ListeningExecutorService es = MoreExecutors.listeningDecorator(
                        Executors.newCachedThreadPool(new ThreadFactory() {
                                    public Thread newThread(Runnable r) {
                                        return new Thread(r, "task-worker#" + RandomUtils.nextInt(100));
                                    }}));

    protected static ExecutorService th_pool = Executors.newCachedThreadPool(new ThreadFactory() {
                public Thread newThread(Runnable r) {
                    return new Thread(r, "thrd-worker#" + RandomUtils.nextInt(100));
                }
            });

    public void test() throws Exception {

        log.debug(">>> test-task/start");

        final CountDownLatch latch = new CountDownLatch(1);

        final ListenableFuture<String> future = es.submit(new Callable<String>() {
            /* (non-Javadoc)
            * @see java.util.concurrent.Callable#call()
            */
            public String call() throws Exception {

                try {
                    long waitMillis = Long.parseLong(RandomStringUtils.randomNumeric(5));

                    log.debug("process waiting.... / waitMillis={}ms", waitMillis);

                    if (waitMillis > 30000)
                        throw new IllegalStateException("system busy...");

                    log.debug("processing...");
                    Thread.sleep(waitMillis); // do anything
                    log.debug("process completed.");

                    return "callback-task finished/" + Thread.currentThread().getName();

                } finally {
                    latch.countDown();
                }
            }
        });

        future.addListener(new Thread() {
            public void run() {
                try {
                    log.debug("--- start Listener: isDone={}, isCancelled={}", future.isDone(), future.isCancelled());
                    log.debug("Listener# future.get()={}", future.get()); // if task failed future.get returned 'java.util.concurrent.ExecutionException'
                    log.debug("--- end Listener");
                } catch (Exception e) {
                    log.error("Failed", e);
                }
            }
        }, th_pool);

        log.debug(">>> test-task/end");
    }

    public static void main(String[] args) {
        try {
            new CallableWithListenerListenableFutureExcample().test();
        } catch (Exception e) {
            e.printStackTrace();
        }
    }
}
実行結果
18:34:41.532 DEBUG [main] o.h.s.g.e.c.CallableWithListenerListenableFutureExcample[37] - >>> test-task/start
18:34:41.547 DEBUG [main] o.h.s.g.e.c.CallableWithListenerListenableFutureExcample[79] - >>> test-task/end
18:34:41.547 DEBUG [task-worker#28] o.h.s.g.e.c.CallableWithListenerListenableFutureExcample[50] - process waiting.... / waitMillis=29422ms
18:34:41.547 DEBUG [task-worker#28] o.h.s.g.e.c.CallableWithListenerListenableFutureExcample[55] - processing...
18:35:10.970 DEBUG [task-worker#28] o.h.s.g.e.c.CallableWithListenerListenableFutureExcample[57] - process completed.
18:35:10.971 DEBUG [thrd-worker#6] o.h.s.g.e.c.CallableWithListenerListenableFutureExcample[70] - --- start Listener: isDone=true, isCancelled=false
18:35:10.972 DEBUG [thrd-worker#6] o.h.s.g.e.c.CallableWithListenerListenableFutureExcample[71] - Listener# future.get()=callback-task finished/task-worker#28
18:35:10.972 DEBUG [thrd-worker#6] o.h.s.g.e.c.CallableWithListenerListenableFutureExcample[72] - --- end Listener
もし、スレッド内で失敗(例外処理が発生)するとfuture.get()でjava.util.concurrent.ExecutionExceptionが返却された。
18:36:12.139 ERROR [thrd-worker#22] o.h.s.g.e.c.CallableWithListenerListenableFutureExcample[74] - Failed
java.util.concurrent.ExecutionException: java.lang.IllegalStateException: system busy...
    at java.util.concurrent.FutureTask$Sync.innerGet(FutureTask.java:252) ~[na:1.7.0_11]
    at java.util.concurrent.FutureTask.get(FutureTask.java:111) ~[na:1.7.0_11]
- コールバック
com.google.common.util.concurrent.Futures.addCallback(ListenableFuture<T>,FutureCallback<? super T>, Executor)を使ってスレッド終了時のコールバックを登録する方式。サンプルは、同時に5個のスレッドを実行して、コールバックでは全てのスレッドが終了された時に全てが完了したことをログに出力する コールバックの場合は、com.google.common.util.concurrent.FutureCallback<T>インタフェースを実装することになり、onSuccess(T result)とonFailure(Throwable cause)を分けて実装することになるからエラーハンドリングなどの実装は明確に行える
public class MultiCallableWithCallbackHandlerListenableFutureExcample {

    private static Logger log = LoggerFactory
            .getLogger(MultiCallableWithCallbackHandlerListenableFutureExcample.class);

    protected static ListeningExecutorService les = MoreExecutors
            .listeningDecorator(Executors
                    .newCachedThreadPool(new ThreadFactory() {
                        public Thread newThread(Runnable r) {
                            return new Thread(r, "task-worker#"
                                    + RandomUtils.nextInt(100));
                        }
                    }));

    protected static ExecutorService callbackHandlers = Executors
            .newCachedThreadPool(new ThreadFactory() {
                public Thread newThread(Runnable r) {
                    return new Thread(r, "cab-handler#"
                            + RandomUtils.nextInt(100));
                }
            });

    public void test() throws Exception {
        log.debug(">>> test-task/start");
        try {
            final int taskCount = 5;
            final CountDownLatch latch = new CountDownLatch(taskCount);
            final CountDownLatch startGate = new CountDownLatch(1);

            for (int i = 0; i < taskCount; i++) {
                // invoked task
                Futures.addCallback(les.submit(new Callable<String>() {

                    public String call() throws Exception {

                        try {
                            startGate.await(1000L, TimeUnit.MILLISECONDS);

                            long waitMillis = Long.parseLong(RandomStringUtils.randomNumeric(5));

                            log.debug("process waiting.... / waitMillis={}ms", waitMillis);

                            if (waitMillis > 50000)
                                throw new IllegalStateException("system busy...");

                            log.debug("processing...");
                            Thread.sleep(waitMillis); // do anything
                            log.debug("process completed.");

                            return "callback-task finished/" + Thread.currentThread().getName();

                        } finally {
                            latch.countDown();
                        }
                    }
                }),
                new FutureCallback<String>() {
                            public void onSuccess(String result) {
                                log.info("callback process success. Unresolved task count={},  {}", latch.getCount(), result);
                                if (latch.getCount() <= 0) {
                                    log.info("#### ALL TASK FINISHED ####");
                                }
                            }
                            public void onFailure(Throwable t) {
                                log.warn("callback process failed. Unresolved task count={} : {}", latch.getCount(), t.getMessage());
                                if (latch.getCount() <= 0) {
                                    log.info("#### ALL TASK FINISHED ####");
                                }
                            }
                        },
                callbackHandlers);
            }

            // start all tasks
            startGate.countDown();

        } catch (Exception e) {
            log.error("Failed", e);
        }
        log.debug(">>> test-task/end");
    }

    public static void main(String[] args) {
        try {
            new MultiCallableWithCallbackHandlerListenableFutureExcample()
                    .test();
        } catch (Exception e) {
            e.printStackTrace();
        }
    }
}
実行結果
18:46:29.142 DEBUG [main] o.h.s.g.e.c.MultiCallableWithCallbackHandlerListenableFutureExcample[43] - >>> test-task/start
18:46:29.169 DEBUG [main] o.h.s.g.e.c.MultiCallableWithCallbackHandlerListenableFutureExcample[99] - >>> test-task/end
18:46:29.171 DEBUG [task-worker#12] o.h.s.g.e.c.MultiCallableWithCallbackHandlerListenableFutureExcample[60] - process waiting.... / waitMillis=3868ms
18:46:29.171 DEBUG [task-worker#87] o.h.s.g.e.c.MultiCallableWithCallbackHandlerListenableFutureExcample[60] - process waiting.... / waitMillis=36163ms
18:46:29.171 DEBUG [task-worker#12] o.h.s.g.e.c.MultiCallableWithCallbackHandlerListenableFutureExcample[65] - processing...
18:46:29.171 DEBUG [task-worker#14] o.h.s.g.e.c.MultiCallableWithCallbackHandlerListenableFutureExcample[60] - process waiting.... / waitMillis=54401ms
18:46:29.171 DEBUG [task-worker#12] o.h.s.g.e.c.MultiCallableWithCallbackHandlerListenableFutureExcample[60] - process waiting.... / waitMillis=71526ms
18:46:29.171 DEBUG [task-worker#96] o.h.s.g.e.c.MultiCallableWithCallbackHandlerListenableFutureExcample[60] - process waiting.... / waitMillis=63505ms
18:46:29.171 DEBUG [task-worker#87] o.h.s.g.e.c.MultiCallableWithCallbackHandlerListenableFutureExcample[65] - processing...
18:46:29.174 WARN  [cab-handler#47] o.h.s.g.e.c.MultiCallableWithCallbackHandlerListenableFutureExcample[84] - callback process failed. Unresolved task count=2 : system busy...
18:46:29.174 WARN  [cab-handler#65] o.h.s.g.e.c.MultiCallableWithCallbackHandlerListenableFutureExcample[84] - callback process failed. Unresolved task count=2 : system busy...
18:46:29.174 WARN  [cab-handler#95] o.h.s.g.e.c.MultiCallableWithCallbackHandlerListenableFutureExcample[84] - callback process failed. Unresolved task count=2 : system busy...
18:46:33.041 DEBUG [task-worker#12] o.h.s.g.e.c.MultiCallableWithCallbackHandlerListenableFutureExcample[67] - process completed.
18:46:33.042 INFO  [cab-handler#95] o.h.s.g.e.c.MultiCallableWithCallbackHandlerListenableFutureExcample[78] - callback process success. Unresolved task count=1,  callback-task finished/task-worker#12
18:47:05.337 DEBUG [task-worker#87] o.h.s.g.e.c.MultiCallableWithCallbackHandlerListenableFutureExcample[67] - process completed.
18:47:05.337 INFO  [cab-handler#95] o.h.s.g.e.c.MultiCallableWithCallbackHandlerListenableFutureExcample[78] - callback process success. Unresolved task count=0,  callback-task finished/task-worker#87
18:47:05.338 INFO  [cab-handler#95] o.h.s.g.e.c.MultiCallableWithCallbackHandlerListenableFutureExcample[80] - #### ALL TASK FINISHED ####
guavaさんのお陰で簡単に非同期実装ができました。
今回のコードはこちら
spring-boot で非同期処理を試してみた
spring-boot を使ったシンプルな非同期処理
springframeworkは、http://spring.io/projects に紹介されるとおり多くのプロダクトを提供している。そんな私もかなり昔から使っている. 今日そんな spring プロダクトの1つで spring-boot を試してみた.
spring-boot は、springframework を利用したWebアプリケーションを簡単に作成できるようにした product. 特にここ最近は Playframework などJVMのWebフレームワークは注目を集めている気がするけど、spring-bootは、Dropwizard に影響を受けたと言われている.
今回は spring-boot を使って非同期処理を試してみた. まずは、spring-boot は gradle を使った build を推奨しているようだけど、maven も guide にあるし慣れているから maven で作成. ちなみに、IDEは、spring が提供している STS を使った.
- STS で project 作成


- とりあえずこんな感じで project を作成すると pom.xml は以下のように生成された
<?xml version="1.0" encoding="UTF-8"?>
<project xmlns="http://maven.apache.org/POM/4.0.0" xmlns:xsi="http://www.w3.org/2001/XMLSchema-instance"
    xsi:schemaLocation="http://maven.apache.org/POM/4.0.0 http://maven.apache.org/xsd/maven-4.0.0.xsd">
    <modelVersion>4.0.0</modelVersion>

    <groupId>org.horiga.study</groupId>
    <artifactId>study-simple-springboot</artifactId>
    <version>0.0.1-SNAPSHOT</version>

    <name>study-simple-springboot</name>
    <description>Demo project</description>

    <parent>
        <groupId>org.springframework.boot</groupId>
        <artifactId>spring-boot-starter-parent</artifactId>
        <version>1.0.2.RELEASE</version>
        <relativePath/> <!-- lookup parent from repository -->
    </parent>

    <dependencies>
        <dependency>
            <groupId>org.springframework.boot</groupId>
            <artifactId>spring-boot-starter-web</artifactId>
        </dependency>
        <dependency>
            <groupId>org.springframework.boot</groupId>
            <artifactId>spring-boot-starter-test</artifactId>
            <scope>test</scope>
        </dependency>
    </dependencies>

    <properties>
        <project.build.sourceEncoding>UTF-8</project.build.sourceEncoding>
        <start-class>org.horiga.study.springboot.web.Application</start-class>
        <java.version>1.7</java.version>
    </properties>

    <build>
        <plugins>
            <plugin>
                <groupId>org.springframework.boot</groupId>
                <artifactId>spring-boot-maven-plugin</artifactId>
            </plugin>
        </plugins>
    </build>

</project>
この時点で、既に起動する状態.

  .   ____          _            __ _ _
 /\\ / ___'_ __ _ _(_)_ __  __ _ \ \ \ \
( ( )\___ | '_ | '_| | '_ \/ _` | \ \ \ \
 \\/  ___)| |_)| | | | | || (_| |  ) ) ) )
  '  |____| .__|_| |_|_| |_\__, | / / / /
 =========|_|==============|___/=/_/_/_/
 :: Spring Boot ::        (v1.0.2.RELEASE)

2014-05-11 17:08:51.259  INFO 4687 --- [           main] o.h.study.springboot.web.Application     : Starting Application on hiroyuki-no-MacBook-Air.local with PID 4687 (/Users/horiga/Documents/workspace-sts-3.5.0.RELEASE/study-simple-springboot/target/classes started by horiga in /Users/horiga/Documents/workspace-sts-3.5.0.RELEASE/study-simple-springboot)
2014-05-11 17:08:51.315  INFO 4687 --- [           main] ationConfigEmbeddedWebApplicationContext : Refreshing org.springframework.boot.context.embedded.AnnotationConfigEmbeddedWebApplicationContext@5dcf031e: startup date [Sun May 11 17:08:51 JST 2014]; root of context hierarchy
2014-05-11 17:08:52.420  INFO 4687 --- [           main] .t.TomcatEmbeddedServletContainerFactory : Server initialized with port: 8080
2014-05-11 17:08:52.663  INFO 4687 --- [           main] o.apache.catalina.core.StandardService   : Starting service Tomcat
2014-05-11 17:08:52.664  INFO 4687 --- [           main] org.apache.catalina.core.StandardEngine  : Starting Servlet Engine: Apache Tomcat/7.0.52
2014-05-11 17:08:52.777  INFO 4687 --- [ost-startStop-1] o.a.c.c.C.[Tomcat].[localhost].[/]       : Initializing Spring embedded WebApplicationContext
2014-05-11 17:08:52.778  INFO 4687 --- [ost-startStop-1] o.s.web.context.ContextLoader            : Root WebApplicationContext: initialization completed in 1468 ms
2014-05-11 17:08:53.326  INFO 4687 --- [ost-startStop-1] o.s.b.c.e.ServletRegistrationBean        : Mapping servlet: 'dispatcherServlet' to [/]
2014-05-11 17:08:53.329  INFO 4687 --- [ost-startStop-1] o.s.b.c.embedded.FilterRegistrationBean  : Mapping filter: 'hiddenHttpMethodFilter' to: [/*]
2014-05-11 17:08:53.632  INFO 4687 --- [           main] o.s.w.s.handler.SimpleUrlHandlerMapping  : Mapped URL path [/**/favicon.ico] onto handler of type [class org.springframework.web.servlet.resource.ResourceHttpRequestHandler]
2014-05-11 17:08:53.752  INFO 4687 --- [           main] o.s.w.s.handler.SimpleUrlHandlerMapping  : Mapped URL path [/**] onto handler of type [class org.springframework.web.servlet.resource.ResourceHttpRequestHandler]
2014-05-11 17:08:53.752  INFO 4687 --- [           main] o.s.w.s.handler.SimpleUrlHandlerMapping  : Mapped URL path [/webjars/**] onto handler of type [class org.springframework.web.servlet.resource.ResourceHttpRequestHandler]
2014-05-11 17:08:53.938  INFO 4687 --- [           main] o.s.j.e.a.AnnotationMBeanExporter        : Registering beans for JMX exposure on startup
2014-05-11 17:08:53.965  INFO 4687 --- [           main] s.b.c.e.t.TomcatEmbeddedServletContainer : Tomcat started on port(s): 8080/http
2014-05-11 17:08:53.967  INFO 4687 --- [           main] o.h.study.springboot.web.Application     : Started Application in 3.049 seconds (JVM running for 3.513)
ちなみにここまで1分くらい. 組み込みtomcatが含まれているからそのまま動く. ちなみにデフォルトログはコンソールに出力されて、INFO レベルだから、ログレベルを変更する場合は、--debugを引数につけるとログレベルがDEBUGになった.
では、Controller/RequestMapping, Serviceを追加してみる. そして、非同期を支援するためには、@EnableAsync アノテーションを付与しなければならない
- Application.java
@Configuration
@ComponentScan
@EnableAutoConfiguration
@EnableAsync // support asynchronous methods
public class Application {

    public static void main(String[] args) {
        SpringApplication.run(Application.class, args);
    }
}
- Controller クラス
@Controller
@RequestMapping("/study")
public class StudyController {

    private static Logger _log = LoggerFactory.getLogger(StudyController.class);

    @Autowired
    private  StudyService studyService;

    @RequestMapping("/async/{jobs}")
    @ResponseBody
    String async(@PathVariable("jobs") int jobs) throws Exception {

        _log.info(">>> [start] handleRequest !!");
        final long stat = System.currentTimeMillis();

        if (jobs <= 0)
            return "done.";

        final CountDownLatch latch = new CountDownLatch(jobs);
        List<Future<String>> results = new ArrayList<Future<String>>(jobs);
        for (int i=0; i<jobs; i++) {
            Future<String> res = studyService.processWithAsync(latch, i * 100L);
            results.add(res);
        }

        latch.await(1000, TimeUnit.MILLISECONDS);

        _log.info(">>> [end] Complete jobs !!: elapsed: {}ms", System.currentTimeMillis() - stat);

        StringBuilder sb = new StringBuilder();
        for (Future<String> f : results) {
            sb.append("[");
            if (f.isDone()) {
                sb.append(f.get());
            }
            else {
                sb.append("timeout...");
            }
            sb.append("],");
        }

        return sb.toString();
    }

    @ResponseStatus(value=HttpStatus.REQUEST_TIMEOUT)
    @ExceptionHandler(value = TimeoutException.class)
    @ResponseBody String handleTimeout() {
        return "timeout";
    }

    @ResponseStatus(value=HttpStatus.INTERNAL_SERVER_ERROR)
    @ExceptionHandler(value=Exception.class)
    @ResponseBody String handleException(HttpServletRequest req, Exception exception) {
        return "internal error";
    }

}
@Service
public class StudyService {

    private static Logger _log = LoggerFactory.getLogger(StudyService.class);

    @Async
    public Future<String> processWithAsync(final CountDownLatch latch, final Long waitMillis) {

        try {
            _log.info("[start] processWithAsync(wait={}ms)!!", waitMillis);
            try {
                Thread.sleep(waitMillis);
            } catch (InterruptedException e) {}
            _log.info("[ end ] processWithAsync(wait={}ms)!!", waitMillis);
            return new AsyncResult<String>(
                    new StringBuilder("ID-").append(Thread.currentThread().getName())
                    .append(Thread.currentThread().getId()).toString());
        } finally {
            latch.countDown();
        }
    }

}
- ここまで、できたら起動してアクセスしてみる
$ curl localhost:8080/study/async/5 -iks
HTTP/1.1 200 OK
Server: Apache-Coyote/1.1
Content-Type: text/plain;charset=ISO-8859-1
Content-Length: 166
Date: Sun, 11 May 2014 08:47:49 GMT

[ID-SimpleAsyncTaskExecutor-641],[ID-SimpleAsyncTaskExecutor-742],[ID-SimpleAsyncTaskExecutor-843],[ID-SimpleAsyncTaskExecutor-944],[ID-SimpleAsyncTaskExecutor-1045],
- ログを見ると非同期になってそう
2014-05-11 17:47:49.248  INFO 4751 --- [nio-8080-exec-1] o.h.s.s.web.controller.StudyController   : >>> [start] handleRequest !!
2014-05-11 17:47:49.248  INFO 4751 --- [cTaskExecutor-6] o.h.s.s.web.service.StudyService         : [start] processWithAsync(wait=0ms)!!
2014-05-11 17:47:49.249  INFO 4751 --- [cTaskExecutor-7] o.h.s.s.web.service.StudyService         : [start] processWithAsync(wait=100ms)!!
2014-05-11 17:47:49.249  INFO 4751 --- [cTaskExecutor-6] o.h.s.s.web.service.StudyService         : [ end ] processWithAsync(wait=0ms)!!
2014-05-11 17:47:49.249  INFO 4751 --- [cTaskExecutor-8] o.h.s.s.web.service.StudyService         : [start] processWithAsync(wait=200ms)!!
2014-05-11 17:47:49.249  INFO 4751 --- [cTaskExecutor-9] o.h.s.s.web.service.StudyService         : [start] processWithAsync(wait=300ms)!!
2014-05-11 17:47:49.249  INFO 4751 --- [TaskExecutor-10] o.h.s.s.web.service.StudyService         : [start] processWithAsync(wait=400ms)!!
2014-05-11 17:47:49.350  INFO 4751 --- [cTaskExecutor-7] o.h.s.s.web.service.StudyService         : [ end ] processWithAsync(wait=100ms)!!
2014-05-11 17:47:49.450  INFO 4751 --- [cTaskExecutor-8] o.h.s.s.web.service.StudyService         : [ end ] processWithAsync(wait=200ms)!!
2014-05-11 17:47:49.550  INFO 4751 --- [cTaskExecutor-9] o.h.s.s.web.service.StudyService         : [ end ] processWithAsync(wait=300ms)!!
2014-05-11 17:47:49.651  INFO 4751 --- [TaskExecutor-10] o.h.s.s.web.service.StudyService         : [ end ] processWithAsync(wait=400ms)!!
2014-05-11 17:47:49.652  INFO 4751 --- [nio-8080-exec-1] o.h.s.s.web.controller.StudyController   : >>> [end] Complete jobs !!: elapsed: 404ms
いやー簡単に実装できた. ほんとここまで30分かからない. Javaはなんだかんだコード量が多くなるとかコンパイルが大変とかあるけど、やっぱりこんな素晴らしいフレームワークとか出てくるし、最近だと大きなところもJVM系(ScalaとかClosure)注目しているみたいだなぁ...
- 作成したproject はこちら